Happy Quilt Top

Pink and white Quilt Top blowing in the breeze

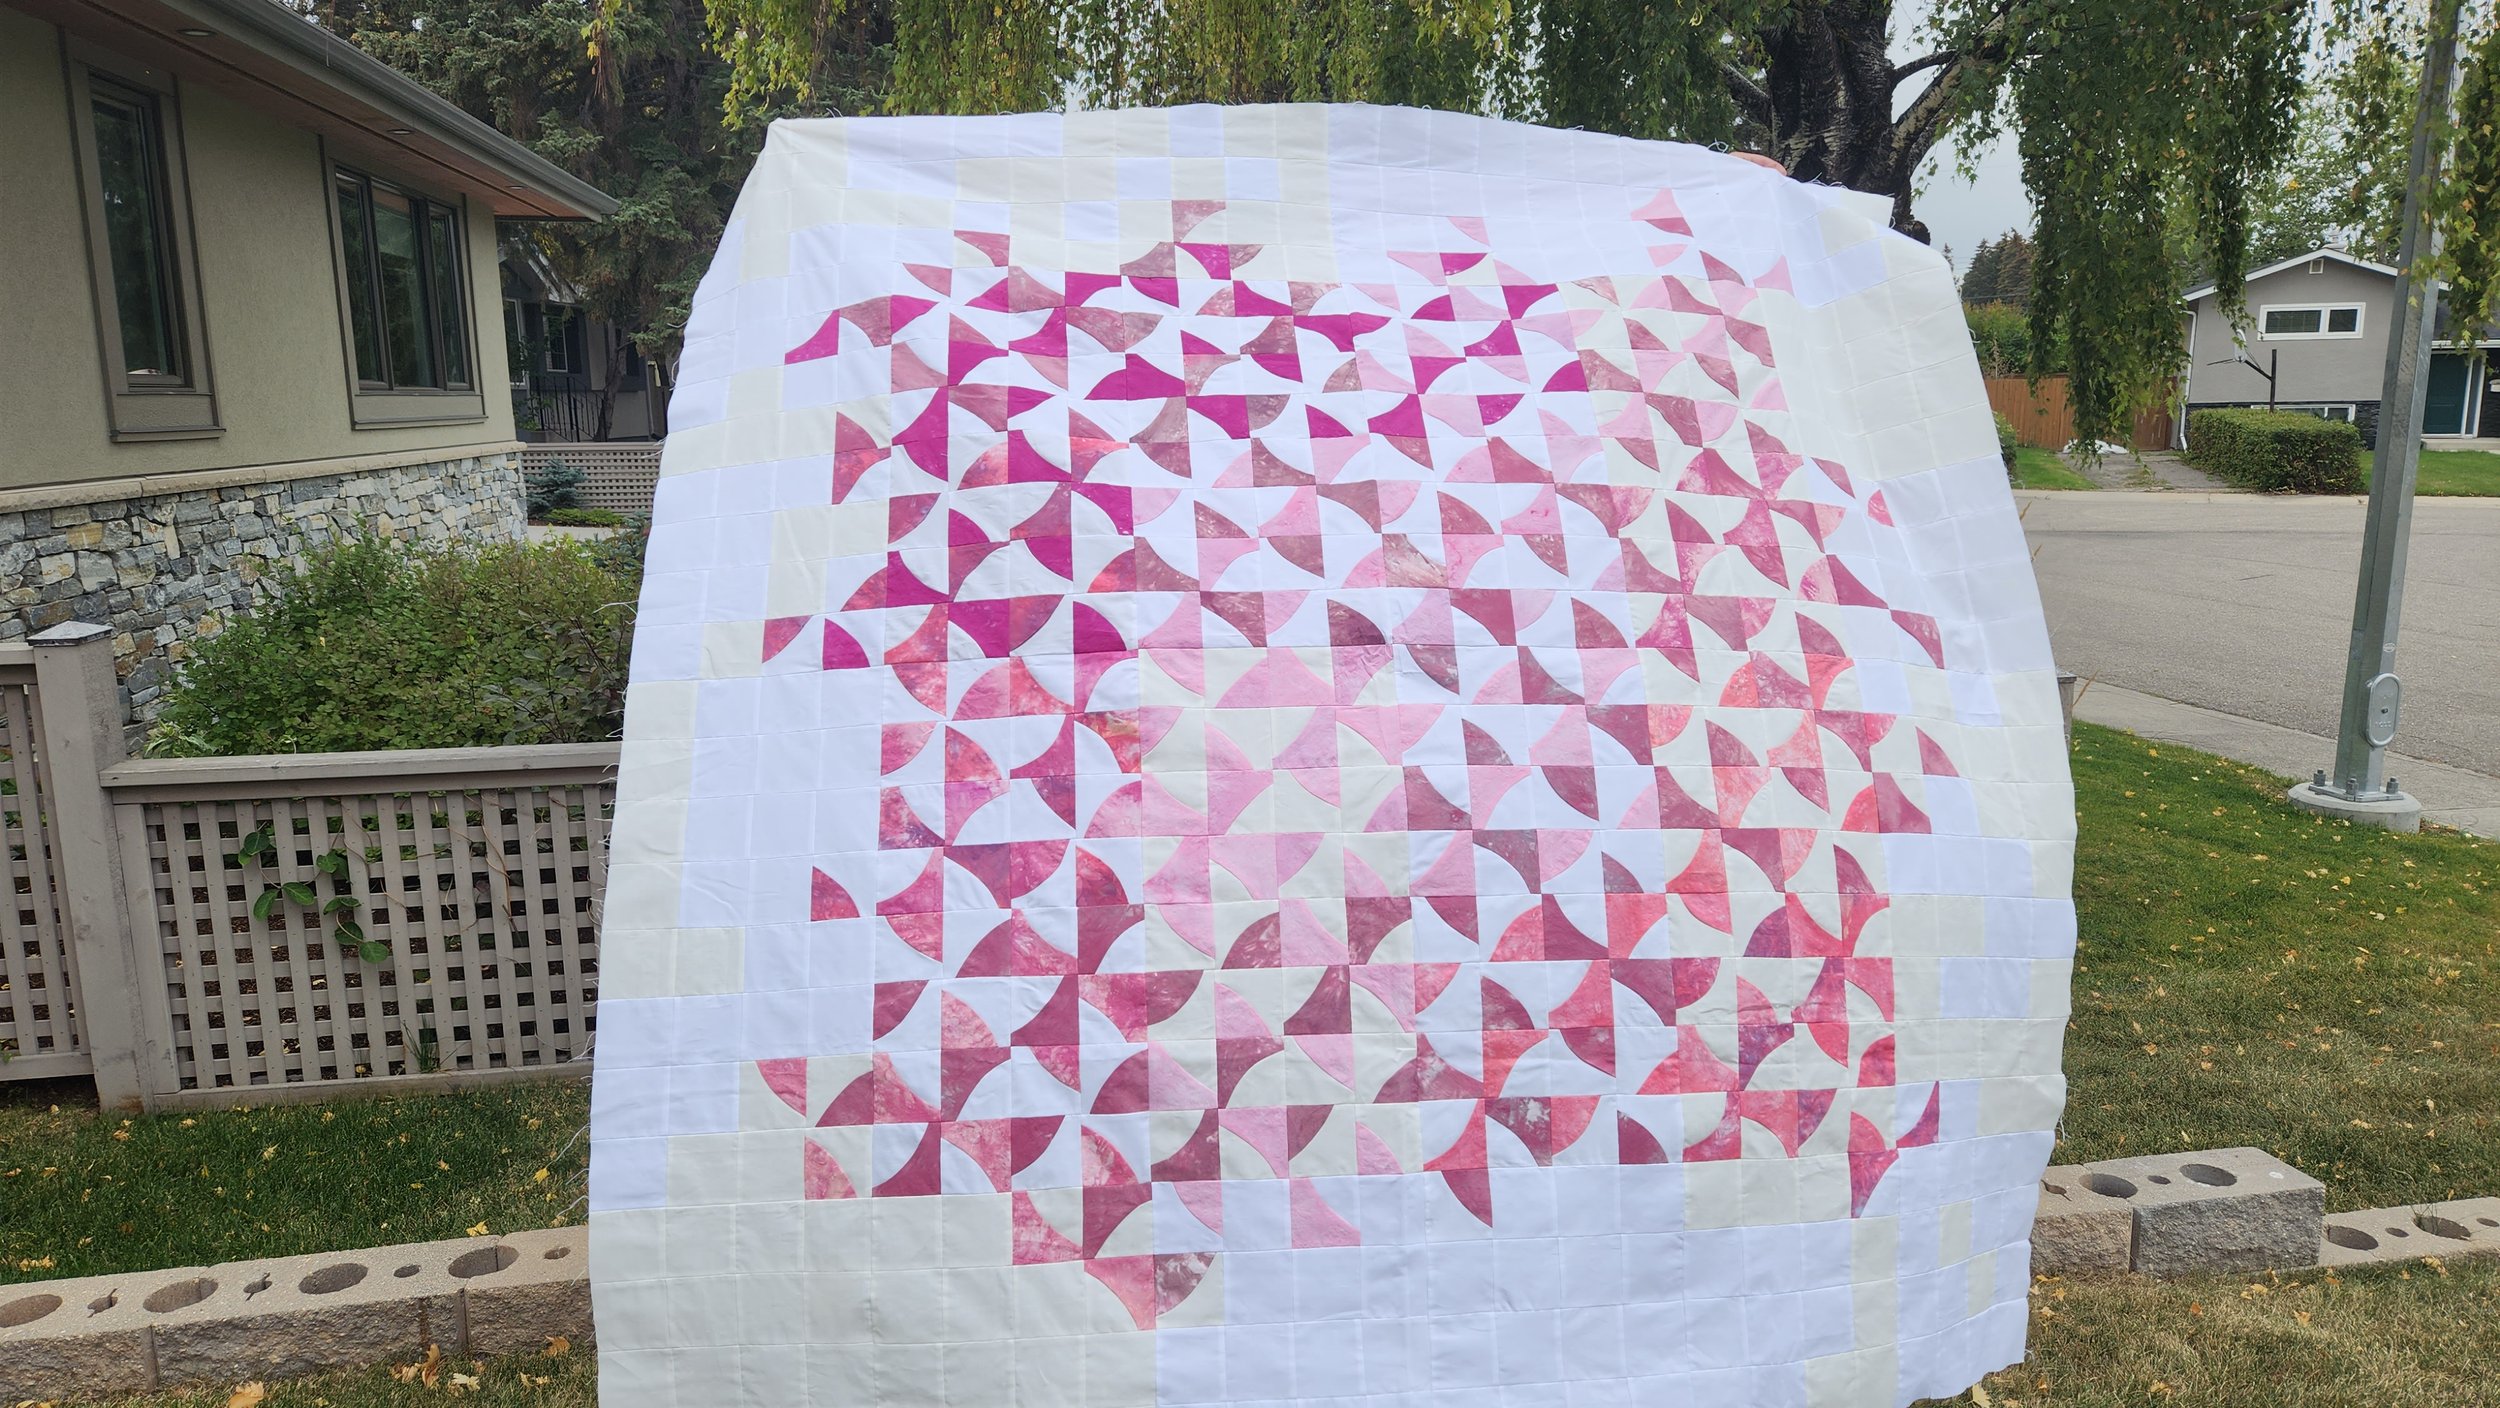
Not too long ago someone asked me how I design a quilt. Like, how do you go from idea to finished quilt? For all that I talk about play and experimentation, my answer was a bit of a cliche. The truth is, I rarely design a quilt. Instead, I try an idea out and see if it works, see if it grabs me. If I like it, then I make a bunch of things My great pleasure comes when I am trying to make all those things look good together. That is also the greatest challenge. When the last seam is stitched 90% of the time I could never have predicted (designed) the quilt I ended up with.

This particular quilt, for instance, actually started with a sample block for a virtual class. The pinks were piled up, rejects from my Perimenpause Chronicle Quilt. So when a request came from a student for a particular make I grabbed what was on the top of the table. The block worked, I set it aside. And honestly? I didn’t think about it again for months. The next time I pulled it out for a class it never got put away. Then, back in May it popped into my line of sight and I decided to make a second block. It was with the third block that I realized I’d gone from an experiment to a quilt top.

8 pink fabric blocks cut with an improv quarter circle

So I just made my way through the pile of hand dyed fabric. First I used all the pink pinks. That didn’t get me very far so I used the more purply ones too. I don’t really like to make small quilts and I was then out of enough of the pink and purple fabrics so I dyed some more. They ended up a lot lighter and I debated trying again but decided to just make it work.

Another thing I had to make work was the background fabrics. Somewhere along the way I grabbed a different white than the one I started with. Because I was mostly working in the evening, under artificial light, I didn’t notice immediately. I had a choice to make - redo the blocks with the different white or keep going. Because I am kind of lazy I kept going. But what I did was embrace the differences and made the remaining blocks a mix of both whites. That way your eye wasn’t going to be drawn straight to the outlier.

Pink and White Pinhweel Quilt Top on fence

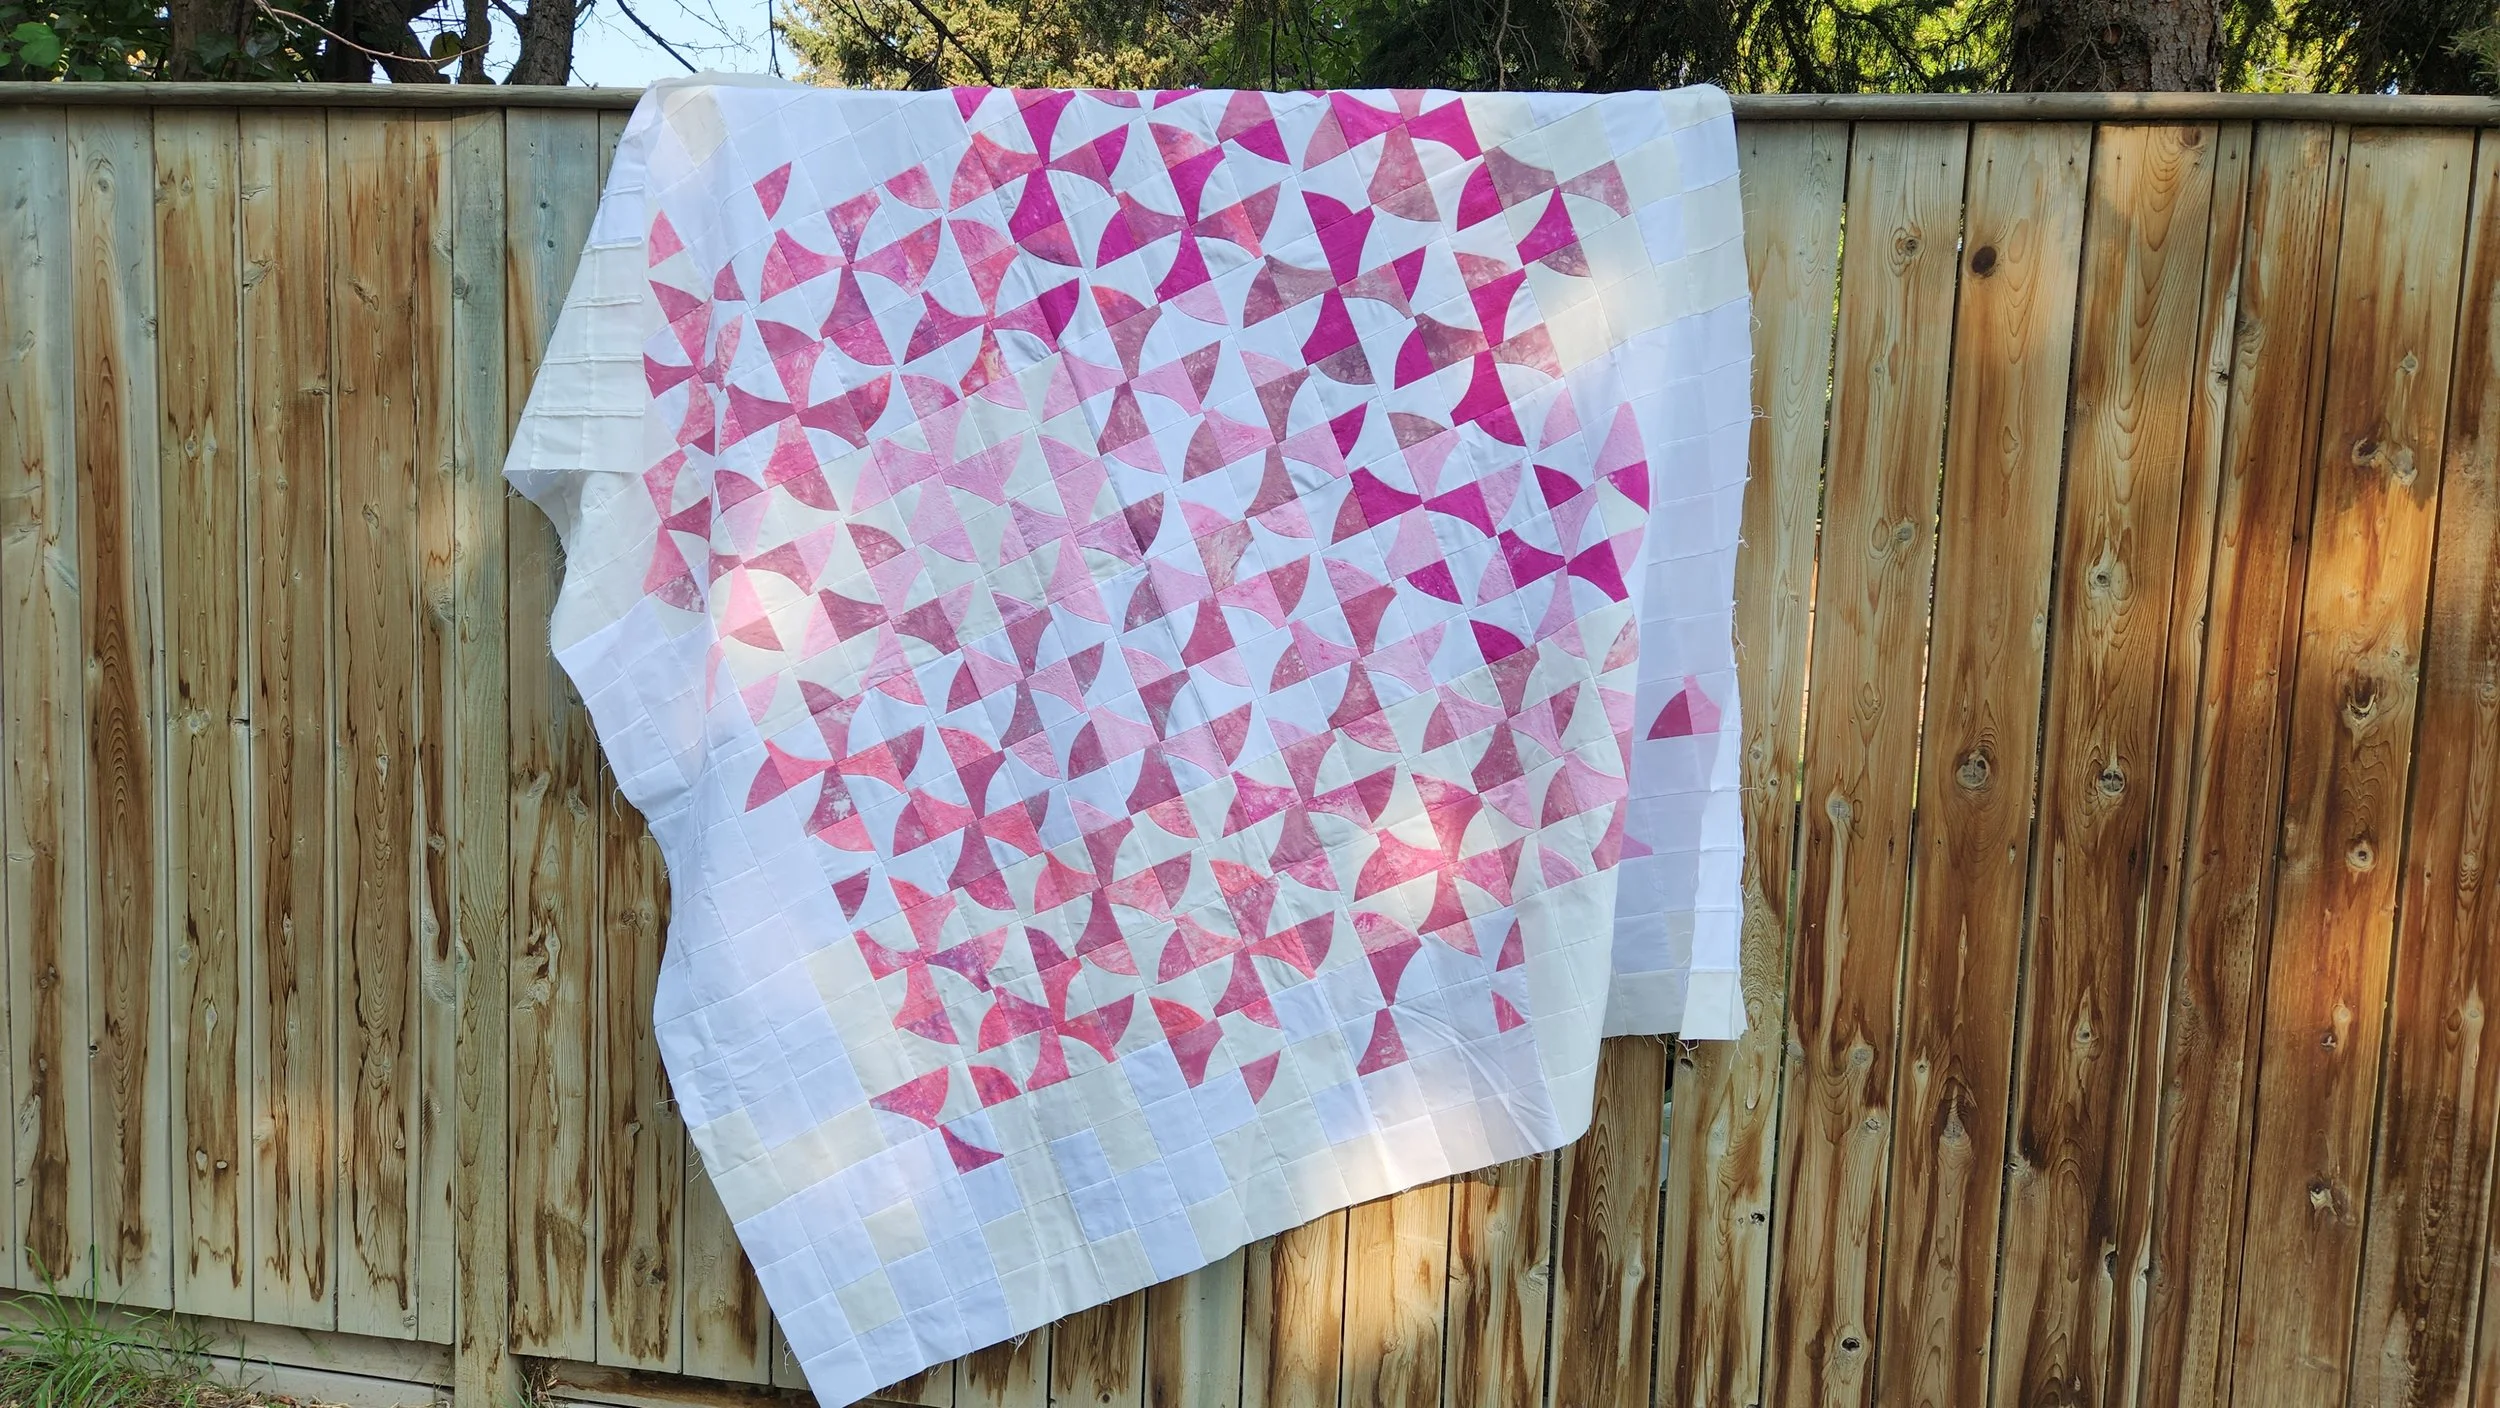
The amount of pink fabric I had was going to make a 48” square quilt when all was said and done. Not too shabby, really. By this point though, this quilt - puttering on this quilt - was really helping my mental health so I decided I wasn’t ready to stop making. I spent a fair amount of time contemplating things on the design wall then decided on something akin to a border. In places the pink curves extend out beyond the centre square. Most of the outside is white, however. Rather than make it a solid white and have. bunch of weird piecing to accommodate those extra pink bits I made the border out of the same size 16 patch blocks as the centre. So really, the quilt top is basic patchwork of 576 4” squares.

We won’t talk about the backing debacle, but I am back on track to get this basted shortly. I plan on a mix of machine and hand quilting so I would like it ready for when the snow flies and we are indoors a bit more.

July Morning Make 2022

Red and Black embroidery floss, white Aida cloth, and books about Ukrainian embroidery

Frankly, I can’t believe it’s taken me this long to try my hand at the classic red and black Ukrainian embroidery. A first generation Canadian on my Dad’s side with a Baba (grandmother) who never spoke English and spent her summers gardening and winters with a needle, I honestly never felt the need. I mean, we have oodles and oodles of her stitching in our homes. And that doesn't count the suitcase full an aunt stole and the probably hundreds of pieces she gave away to churches, family, and friends. (Much like it will be with my quilts when I die.) With the war in Ukraine and some pride in my heritage, plus a desire for some hand stitched over the summer, I decided to pick up the floss.

For patterns I dug into my stash of supplies I have from my Baba - books, papers, and patterns. I recognized pieces and fondly recalled the decoration she would make for our blouses in Ukrainian dance. All patterns, no instructions. Without her here to guide me I turned to the modern teacher: You Tube.

Red and black Ukrainian embroidery
Red and Black Ukrainian embroidery
Red and black central design Ukrainian embroidery

In the end I finished 4 small bits of embroidery. I didn’t set out to ‘make’ anything. For one, I had no idea how long it would take. Two, I figured it would get tedious to do the same repeating pattern for an entire month. And three, I don’t really need more pieces of embroidery in the house. All four pieces could, if I wanted to, be turned into bookmarks.

I found the whole process quite relaxing. Challenging at first, just because of the counting and need to follow patterns. Once you got into a rhythm, though, it became very soothing. I don’t know that I will do it again, but it was special to go back to my heritage this month.

Jules, or my Arkison in Australia Quilt

Mustard yellow, pale blue, and white quilt blowing in the breeze between two spruce trees

Jules

85” x 66”

I’ve never been so sad to finish a quilt. Seriously, a few tears were shed.

This was an epic quilt making journey that started on my teaching trip to Australia back in 2016. I was demonstrating improv curves for some students and grabbed the first two interesting fabrics from the little shop onsite. Over the course of my trip I did a few more demos with that fabric, then collected fabric from both my students and a screen printing adventure. When I came home it made sense to me to keep playing with all those fabrics, like they were meant to be. I added a bit more from my stash and away I went.

Improv quilting can be a total free for all and work wonderfully, but it also works really well with guidelines or even limitations. In addition to my limited colour palette I restricted my improv components to a few key shapes/techniques: curves, diamonds, triangles, and little bits. It may sounds like a lot, but it actually isn’t. Not when it comes to improv.

A mustard yellow, pale blue, and white improv quilt blowing in the breeze

I basically kept making components until I ran out of the fabrics, leaving a little behind to help me create a quilt top. I did not pay attention to size of the blocks when making or squaring up. When I felt finished making all the components I moved on to my favourite part - making them all play well together in the quilt top. Design wall play is the absolute best. It’s all about making it work as both a composition and simply to use up all the pieces.

And then she sat. And sat and sat. That’s just how things go in my world. I even had the backing fabric - gifts from Emma Jean Jansen, an Aussie designer and one of my students in Australia - but wasn’t ready to quilt her yet. The truth is that I knew how she deserved to be quilted and I wasn’t quite up for the challenge.

When I was asked to put together my show for the Heritage Park Quilter of Distinction display I knew I had to include this quilt. It was time to face the work.

Close up of a mustard yellow, pale blue, black and white quilt with hand stitched details

My plan from the beginning was a combination of machine and hand stitching. And most of the machine stitching with would in the ditch. On a quilt like this that meant a lot, a lot of starts and stops. Which also means a lot of burying threads. Nothing like taking on this much work on a deadline! Did I mention the hand quilted elements too?

The bulk of the handwork was finished on an epic road trip we took in May. At least, the parts not done in front of the TV while I ignored the world. It even required a stop at a quilt store in Kelowna and I was very sad I did not have time to shop for anything other than a tool to help me bury my threads. There is at least 20 hours of handwork in her. She is full of my love.

Sure, it was a lot of work and every single stitch was worth it. The quilt came out exactly how I wanted it to, how I envisioned her.

The machine quilting was all done in a pale blue thread from my stash. It might have been a Presencia 100% cotton collected years before the quilt even started. The hand quilted touches were all done with Wonderful Perle cotton, in a couple of different blues and yellows. This included stitching down the binding, on the front, with big blue stitches.

I won’t lie, I was also intimidated by doing that much handstitching, even though it was my own idea. But thankfully, quilting an entire quilt for Morning Make last year built my confidence and comfort.

A girls arms hugging a mustard yellow, pale blue, and white quilt

Did I mention there were a few tears when she was finished? That trip to Australia was formative for me. It was her furthest and longest I’ve been gone from home. I developed and delivered multi day workshops which were an absolute dream. The people I met were incredible and I am still in touch with many of them. This quilt also defined one of my favourite ways to make a quilt - by playing.

She is named for Jules. Jules McMahon was the woman who brought me to Australia. We knew each other online and had met at the early QuiltCons. But that trip solidified a friendship through road trips, sweets exchanges, late nights with wine, creative bonding, gluten free Chinese food, exploring for Lyre Birds, a love of circles, and one chilly ocean swim. We have similar levels of insanity and drive and I am grateful to her for the trip to Australia, yes, but also for continued friendship and inspiration.

June Morning Make 2022

Blue and Beige woven raffia basket next to a rock and a blown blue glass vase with native grasses in it

June was a bit of a weird month. I did not set out with a specific Morning Make in mind because I knew I was having surgery in the early part of the month and my recovery time would keep me from making. At first, I just continued with the watercolour paintings of the previous month. Then, post recovery, I grabbed a woven basket kit from Flax and Twine to play with.

The Calliope Basket is one of the raffia basket weaving kits from Anne that I purchased after my previous basket making endeavours. I was curious to try a different material and process. As I expected, it was relaxing and meditative to do this.

Ten rounds of raffia basket making - the beginnings of a blue and beige woven basket

The kit is well stocked with more raffia than you will need, a strong needle, snips, and both paper instructions and access to a video. I had enough raffia to make two baskets (that ended up nesting, but that was purely by accident) with some leftover for another. I’m sure that if I had been able to keep my weaving more flat, more platelike as per the instructions, I would have gone through a different amount and only made one. To be honest, I’m not sure what exactly I did to make it more round than flat, but I am not complaining. If I had asked Anne at Flax and Twine she probably would have sorted me out.

Calliope Basket kit from Flax and Twine

The kit comes with a choice of colours in your raffia so you can coordinate with your decor, if you like. We like blue in this house so I chose this deep indigo.

I won’t lie, I want to learn all the basket weaving. There are so many designs, techniques, and styles from around the world. I am definitely not done exploring. The kits from Flax and Twine have definitely opened up a world of suggestions.