
 How very Martha of me. Not that I dyed Easter eggs using cabbage, beets, onions, and turmeric. Not that I also decided to dye some fabric. But the colours are all Martha. And if you look around this site for about five minutes you'll see that I don't generally work in softer colours. Like I always say, it's good to change things up a little.
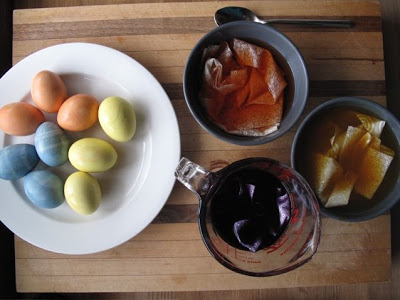
We dyed eggs with friends on Friday. I was totally enamoured with the colours, and very surprised from that orange from just a few onion skins. So I left all the eggs with our friends, but took home the rest of the dye juices. We dyed a few more eggs but that liquid colour looked too good to throw away. I already had all my scraps out so I grabbed some pieces of white on white and threw them in the bowls. The orange is from onion skins, the yellow from turmeric, and the purple measuring cup contains the liquid from boiled red cabbage.
 This is the fabric as it came out of that red cabbage juice. Such a lovely purple. It clearly turned the eggs blue, so this was a bit of a shock. But a good rinse in cold water and some air time to dry and the fabric all turned the same soft blue/grey as the eggs. Perhaps a little less blue.
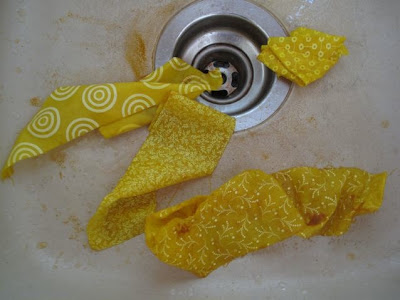 These are the turmeric stained fabrics right out of the dye water. So yellow! And even though I rinsed and rinsed they stained quite bright. And point of fact: turmeric dyed fabric will smell like turmeric long after it is rinsed and dried.
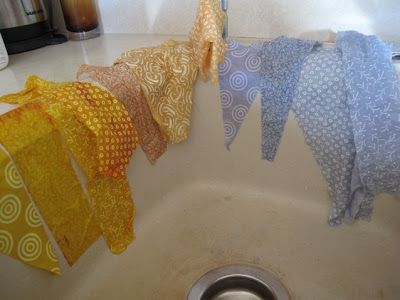 Look at my strips drying so nicely together!
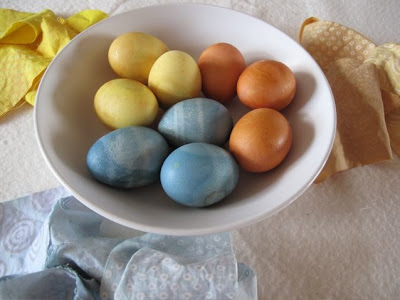 And here are the eggs and their associated fabrics. In truth, they may be Martha colours, but they really are softer versions of the colours already in our house, namely turquoise and orange.
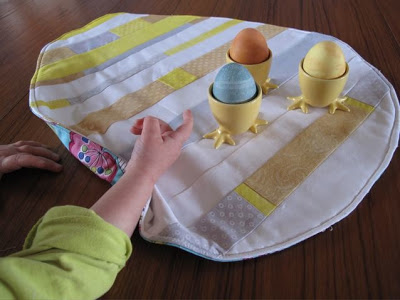 So I took all the scraps, trimmed them into strips, and started sewing. I went for the silly a little, in making an egg shaped placemat. This was easy to do. I simply created an egg shape out of paper so I had something to compare to as I sewed. You could also use it as a paper pieced project. Then I sewed the strips together. Once I knew I had my desired size I trimmed the top, cut out backing and batting and sewed it all together with right sides together.
This is the fabric as it came out of that red cabbage juice. Such a lovely purple. It clearly turned the eggs blue, so this was a bit of a shock. But a good rinse in cold water and some air time to dry and the fabric all turned the same soft blue/grey as the eggs. Perhaps a little less blue.These are the turmeric stained fabrics right out of the dye water. So yellow! And even though I rinsed and rinsed they stained quite bright. And point of fact: turmeric dyed fabric will smell like turmeric long after it is rinsed and dried.Look at my strips drying so nicely together!And here are the eggs and their associated fabrics. In truth, they may be Martha colours, but they really are softer versions of the colours already in our house, namely turquoise and orange.So I took all the scraps, trimmed them into strips, and started sewing. I went for the silly a little, in making an egg shaped placemat. This was easy to do. I simply created an egg shape out of paper so I had something to compare to as I sewed. You could also use it as a paper pieced project. Then I sewed the strips together. Once I knew I had my desired size I trimmed the top, cut out backing and batting and sewed it all together with right sides together.Full disclosure, I screwed up twice when sewing it together. That's what I get for rushing to get it done during naptime. But I got myself sorted out and finished it off after turning it all right sides out and sewing that last seam around the edge.
There is a peak of the backing fabric. I put on something bright and fun so that if/when the top gets wrecked/runs I can use the other side for springtime. And there is my Smilosaurus checking it all out.


 After soaking in the mordant I squeezed out the excess water, but did not rinse the fabric. Then I added it to the dye and simmered for another hour, stirring to make the colour a bit more even. After an hour I turned off the burner and went to bed. This is what it looked like the following afternoon. We decided to go swimming, so I never got to it in the morning.

 Inspired by the look of the jellybags when I made black currant juice I decided to try some natural dyeing the other day. I saw

 Don't you love the colour? Here is the fabric in the morning, just as I took it out of the dye.
