A Year of Garment Sewing - 13 Things I've Learned.

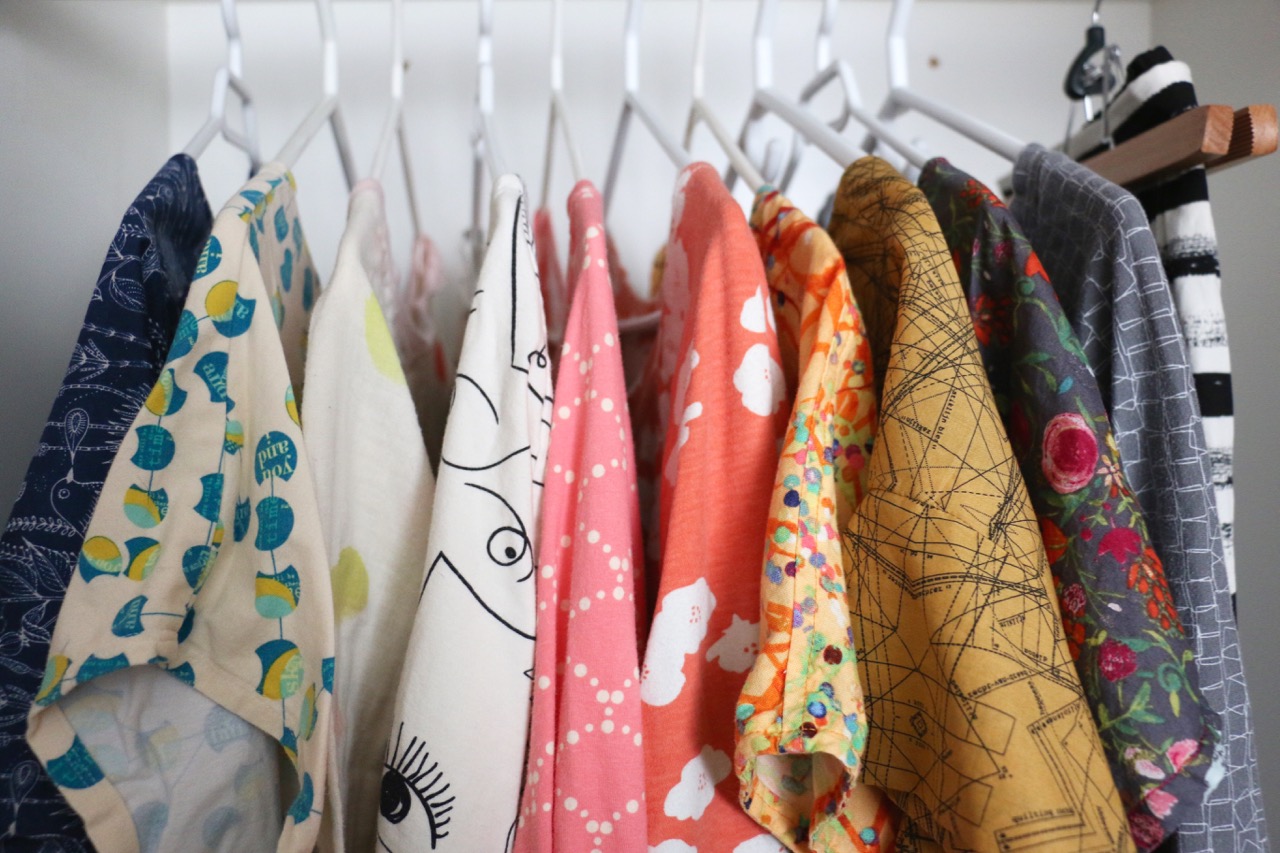
This represents a year of garment sewing. (Minus one sweatshirt and two skirts hanging in other people's closets.) I am suitably impressed with myself.

A year ago I tried making a Linden sweatshirt, then another, and another. I made one more a few months ago. Two years ago I still would have said that I will never sew clothes. Now I have a collection of patterns in the To Make pile and I stash garment fabric. I hardly know myself!

Yet, I am so drawn to garment sewing. I know why, too. This has become my hobby. In order to avoid complete burnout with quilting being my career I needed another outlet. I'm not so keen on other crafts with a small house and limited time. Plus, I really, really like my sewing room. Sure, I could, and do, read in there. But sewing is what I really want to do. If quilting is just too much that day I pull out my tracing paper and already prewashed garment fabric. They are relatively quick finishes compared to quilts, another bonus. Finally, making a garment is a palette cleanser for me. A reward when I finish a quilt, a quick project between big quilts, something to take advantage of a clean cutting table before I mess it up again.

In this past year I've learned a few things about garment sewing.

  • When you are told to use a rayon or poly thread, use it. I had the quilting mindset and was all cotton all the way. But cotton thread has little give and ripped seams in my knits are the results. I've remade one sweatshirt and rehemmed a few others.
  • Make a muslin or test piece. It helps with fit and to work out any confusion that might come with construction. I've been making mine out of solid cottons when the pattern calls for a woven - they are generally cheaper and I can resuse them back for quilt scraps. I make wearables with the knits, knowing I can donate it if it doesn't work out for me.
  • Yet, there are times when you make something and it looks great, but it just isn't you. 
  • Adjusting a pattern isn't that big of a deal.
  • Spend the money on tracing paper. I always trace my patterns instead of cutting the original. It is easier to make changes and then make multiple sizes, if necessary. Like if your best friend asks really nicely for a sweatshirt.
  • Storing the patterns after tracing is a pain. So too when you print a PDF pattern. I've taken to saving paper towel and gift wrap tubes and storing patterns in those.
  • A serger would make my life so much easier, but I really don't know where I would put it. I might have to figure out that detail though.
  • Just because the pattern is popular doesn't mean it will be right for you, for your body. And that's totally okay. If you aren't sure, hit the mall and try on something in a similar style. Then determine if the style works and/or if you could adjust the pattern for yourself.
  • Voile, once washed and sewn in a garment does not drape as I expected.
  • It will almost always take longer than you thought it would.
  • Unless you have the most basic of sewing machines, there are a lot of stitches on your machine that are your friend. Discovering the blind hem stitch and how to use it was a game changer for me, for example.
  • Nearly every independent pattern I've used has extensive resources online. Maybe not from the designer themselves, but a google search will pull up blogs, reviews, and tutorials that can help you with your sewing.
  • Garment sewing is not nearly as scary as I remembered from my Home Ec days.

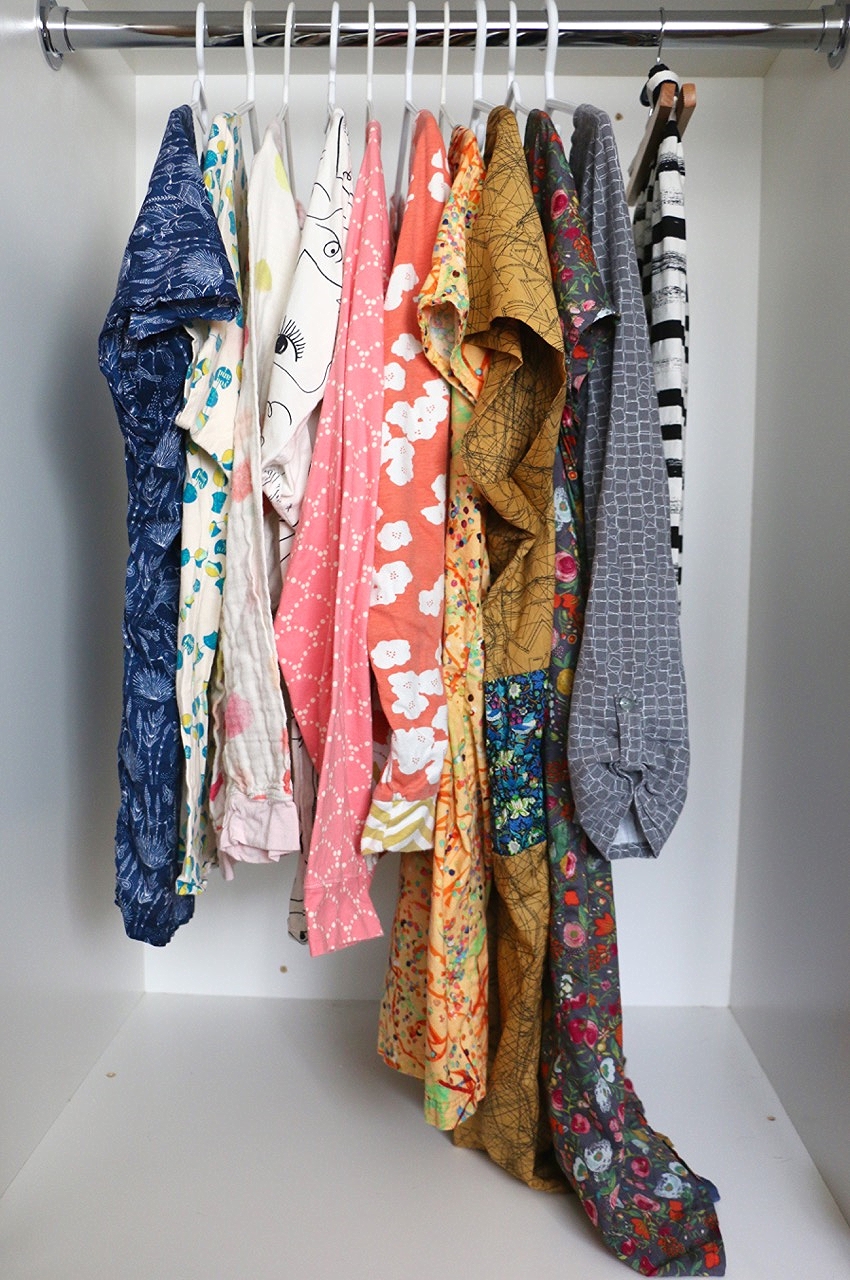
Here is what I have made this past year. When I hung them all together like this I was shocked. I didn't realize I had made this much!

There is a stack of fabric and patterns waiting for more of my time. I wish I could tackle the pants I want to make for the kids, the linen pants for me, a skirt out of Liberty, find the right pattern for the silk/cotton I recently picked up... The list goes on. And I'm pretty excited about that.

Arm Knitting Trial - A Pouf!

Back in January I found myself in Denver (more on that later). While there I got to finally meet Anne Weil from Flax and Twine.  We connected on-line years ago and have that sort of internet friendship that can do no wrong. So to meet and hug in person was such a delight. My last day in Denver Anne happened to be teaching an arm knitting class at Fancy Tiger. How could I resist?!

Arm knitting was surprisingly fun and easy. And this is coming from a non knitter. Anne explained everything so well, demonstrating the technique herself - have you ever tried to teach a class with your arms literally tied up? In the class we covered the basic technique, yarns to use, and knit up the foundation for a pouf. 

What's a pouf? Well, in my house it's become a footrest, a book rest, a toy, a dog hair catcher, a perch for small children, and a back roller. It's whatever you want it to be. Plus, it looks cool.

The most awesome thing about arm knitting is that the yarn is the only supply you need. Barring amputation you have everything else you need.

I made mine out of an orange Wool and the Gang wool. You use 4 skeins of the thick stuff, officially referred to as super bulky (200-250g). Orange, because well, orange! We cast on, made a gauge swatch, then frogged our swatch and started at the project. For a pouf you essentially make a blanket then cinch the ends through the casting on and off stitches. (are there more correct terms for that?) By the end of the class I had my blanket part down and went to the airport armed (ha!) with the instructions to finish the pouf. I hugged Anne goodbye and got out of Denver on Superbowl Sunday.

At home I filled an orange pillowcase with buckwheat hulls, sewed it shut, then cinched my pouf around it, tying it closed. Anne suggested using an old duvet or comforter, even something you find at the thrift store. I wanted something more substantial so it could be a footstool or perch for the kids, hence the strange purchase of 35 pounds of buckwheat hulls (for multiple projects).

Anne literally wrote the book on arm knitting. Knitting Without Needles is a beautiful and fascinating book. It covers both finger and arm knitting - only used your fingers, hands, and arms. And it is so much more than scarves! Despite the freakish amount of quilts in this house and a treasured crochet blanket from a friend I think I want to try my hand at a cozy blanket next, but the pillows and the tote... The book, and Anne, are gorgeous and inspirational.

Denver was a lucky trip. On my way home from QuiltCon judging I fit in an Instructors' Summit with Craftsy. (Anne is also a Craftsy Instructor so that's how we were able to meet.) It was great to get back to Craftsy to connect with staff there and other instructors. Filming my class and ongoing participation with students has been a tremendous experience. 

Now would be a good time to tell you about a promotion Craftsy has going on (seriously, like attending the Summit, this post is only about lucky timing.) For every class you sign up for until March 13 you are entered into a draw to win $1000 for your favourite craft based charity! If you've never signed up for a Craftsy class now is definitely a good time to do it. There are so many interesting and informative classes on Craftsy. Did you know they even have gardening classes? I just discovered that myself. I'm a huge fan of the cooking classes too and am learning photography skills. 

Full disclosure: there is a small incentive for instructors here. For every five NEW buyers I get $100 (That is people who've never purchased a Craftsy class before). That's not my concern though. What I do love is that if 50% of instructors drive at least 1 new buyer they will double the charitable donation.

To be entered in the draw for the donation you have to purchase classes through this link. Feel free to share.

Now, back to regularly scheduled crosswords with my feet up on my pouf.

Quiet Rainbow - A Low Volume and Colourful Quilt

Quiet Rainbow

34'' x 34''

To be honest, I've never made a rainbow quilt before. I know! (Rebecca Bryan would probably understand, probably.). To be really honest, I started this quilt 4 years ago. All of you can probably understand that. 

The top was made when A Month of Sundays was released. I used it as a promo piece and sample on using colour and low volume fabrics - it isn't just for backgrounds. It came around with me to events and classes. I'd planned on finishing it then, but new fabrics! New quilts! Summer!

Low volume is so much more than soft prints, black and whites in the background, and totally scrappy. You can have colour work, order, and control when using them as well. Just as you would for a deeply saturated rainbow of fabrics, you can with low volume. All of these fabrics have white backgrounds and a full range of colours. Let me tell you this, if you think it is hard to find good purples in general, try finding low volume purples that aren't just lilac.

IMG_8440.jpg

Strips sewn together, sliced in half, flipped around, and back together again. Then the two shades of grey to show what can happen when you change the bordering colours. Super simple. Totally striking. 

In January I booked a few hours on the long arm to get some quilts closer to finishing. I had one to get done for sure but an additional hour of time meant I could put a little one on the frame too. This was the little one. I just went with the turquoise Wonderfil Konfetti 50w that was already in the machine with a wavy sort of stipple. Quick and easy and adds great texture. 

There is a little bit of sadness with this finish, however. I recently learned that A Month of Sundays will be discontinued. Simply put, that means it isn't selling well. I won't lie, that stings. This book, I am so intensely proud of it. It really is the resource on using low volume fabrics effectively, but I don't think people really got that the info was there. Not only that, it is really personal - with my family and friends modelling for me and all my writing. I'm sure that personal touch is what made it unattractive to some, but I stand by everything in this book. From the words to the projects to the lessons to the photography by my friend Kate Inglis. I am still thrilled that Stash Books, my publisher, took a chance on this format.

So this means that if you haven't got a copy of this book yet now is the time to get it! Now, before it is gone forever and you can only find it at the guild sale when someone else is cleaning out their library.

From A Judge's Perspective - QuiltCon 2016

QuiltCon is over, the winners announced, and I can finally talk about what it was like to judge the quilts. Phew. Keeping that secret was harder than waiting until the second trimester to announce a pregnancy.

Judging the quilts was an intense and overwhelming experience. Three days that were 10-11 hours long of doing nothing but looking at quilts. Not just looking at them, but touching them, examining stitches, evaluating colour and composition, and yes, comparing them. I've never been so absorbed in quilts before. Thank goodness I wasn't alone. As a team, I worked with Lisa Congdon and Scott Murkin.

The team aspect was fantastic. Lisa, Scott, and I got a long very well. Lisa is an artist and illustrator (and great teacher). Not a quilt expert, but with an amazing eye for colour and composition. Scott is a quilter in his own right and a certified quilt judge. He knows a lot about quilts. I've been quilting for 18 years now and I thought I knew a fair amount. I learned so much from both of them. I feel like, after our time together, we've bonded in a special way. We have private jokes and a shared experience. It was our time in the quilt trenches.

Except that it wasn't the trenches. The Modern Quilt Guild had show offices in this cool building in LA. A creative space full of concrete floors and minimalist design. The kind of space many of us dream about as a modern studio. There was nothing in our judging room other than paper wrapped tables, foam playmats to stand on, and a great window to hear the helicopters and sirens of the city. Not to mention the natural light. But we did spend long, long hours in there. Thankfully, as the judges we were engaged all the time and hardly noticed the passage of time. Towards the end of the day we would look up and boom! It was dark. 

So, what exactly did we do all day?

Simply put, we looked at each and every quilt submitted for judging at QuiltCon. It wasn't a free for all with a stack of quilts though, there was a very defined process that kept us on track and made it as fair as possible for the entrants. Here is the run down on the process, from my perspective. Keep in mind that we were judging quilts already juried in to the show and we did not have any role in the jury process.

- Each category was stacked on the tables, one category at a time. And we could only see the category we were working on, no others.

- The quilts for the entire category were fanned so we got a first look at each of them. This gave us an idea of the category as a whole and the quilts in comparison to the others.

- Each individual quilt was held up for viewing. We stood about 12 feet away. This way we got an idea of what it is like hung. You can see a lot in terms of design, composition, and colour when the quilt is hung and you view from a distance. (Not unlike how you would see it in a show.)

- As the quilt was held up the name of the quilt, and only the name, was said. We did not get descriptions or artists. This judging is blind so we had no idea who made what quilt. We could ask for descriptions, but we maybe asked about a dozen times over the 3 days - only if we were trying to determine whether the quilt was an original design or if the intent of the artist wasn't necessarily clear from the quilt alone.

- Then each quilt was laid down on the table for us to inspect it up close. We would look at everything - quilting stitches, construction techniques, edge finishing, pressing, whether the quilt edges were straight, fabric selection. Trust me, no one has ever looked at the quilts this closely!

- As we examined the quilts we were guided by category specifications that the MQG put together. These outlined the general and specific things to look at in the quilt - from overall design items to quality of the binding.

- Each quilt got at least 3 comments from the judges. We worked together to provide constructive criticism and compliments for each quilt. Scribes wrote down, by hand, our comments. Sometimes we would provide a little + next to one of the category specifications. This meant the work was done particularly well on that specification.

- As we went we would decide if a quilt should be held for an award or released. At the end of seeing all the quilts for a category the held ones would be placed back on the tables for us to see all together. Then began the process of determining winners. 

- Winners were determined by consensus among the judges. We would narrow down the field further, discuss a lot, and eventually get to the top ones in the category. Sometimes this took a lot of discussion and time, but it was always worth it to get to agreement.

(It should be noted that the winners for the Glitz challenge and EZ Triangle Challenge were chosen by Michael Miller and EZ Quilting, we only provided the top choices for them to pick from.)

- Best in Show was picked from the winners of each category.

Phew. Are you tired just reading that? It was both exhausting and exhilarating to do this. Overwhelming and inspiring. 

Judging is just that - judgement. It is subjective and critical. As I said, no one, even the maker, has likely looked at their quilts as close as we did. Call us the quilt police if you want - we did get nitpicky on things like quilting starts and stops and shadowing in seams - but that was our job! These quilts were there to be judged, so that's what we did. Our comments should be viewed as constructive because it was never our intent to make anyone feel bad about their quilt. We can all benefit from a critical eye and having aspects of our quiltmaking to improve upon.

The reason I went into detail about the room and the process is to remind everyone that those days were special. And the team was special. We worked really well together and I so enjoyed my time with Scott and Lisa. You could have put three different people together and likely had different outcomes. Judging, without a doubt, is still subjective. No matter what though, I am proud of the work we did and stand 100% behind the outcomes of our time together.

On a more personal note, I was quite surprised at my own reactions to this experience. I went in thinking I would be obsessive about the technical aspects more than anything, seeking perfection. Early on I realized that what I valued most - personally - was creativity and seeing the hand of the maker. These are, first and foremost, functional quilts, there aren't ever going to be perfect quilts. Once you realize that you start looking for the maker in the piece. You want to see that a person made it and the decisions they made had intent. Yes, you still want a technically proficient quilt that will wear well and not fall apart, but putting yourself in the quilt matters so much. 

It then became important to me to see the show itself hanging at QuiltCon. Because we judged blind and because I made a point of staying off of social media around QuiltCon deadlines I did not know who made the vast majority of the quilts. So I walked the show to see who made what quilts. One of the most exciting things was realizing how many quilters I did not know immediately or at all. (Of course, I can't know everyone.) What it really shows is the depth of the modern quilt world and the fantastic people out there making quilts.